Category: Bluetooth

  • 12 Days of Bluetooth – #11 Command and Control

    When we last looked at Bluetooth Low Energy we looked at the code required to read the battery level from a device. There are two things we didn’t cover – writing values and sending commands to a device.

    Writing in the Air

    If you’re familiar with the service that you are writing to the process of writing a characteristic is fairly straightforward. The value must be passed as a byte array, the formatting of which depends on the characteristic. There are two subtly different methods of writing and you should check the properties of the characteristic to see which is supported. A normal Write operation requires an acknowledgement from the peripheral device so you can determine if/when the operation completes. For fire-and-forget operations the alternative WriteWithoutResponse method will provide a quick way to set a value. Web Bluetooth and 32feet.NET both provide separate methods for these two operations so you can clearly see which is being used.

    Command and Conquer

    The Characteristic in Bluetooth Low Energy can be though of as a Property in object-oriented programming – it has a value that supports some combination of read, write and change notification. There is no direct analogy in Bluetooth LE to a method where you may pass in zero or more arguments and receive some other value in return. However there are many third-party services which implement their own support for this using one or more characteristics.

    One of these is the Lego Wireless Protocol which is used with a range of Boost devices and the 2 port hub used in their range of trains. It does this using a single characteristic which supports write (without response) and notify operations. The hub can send you messages via the notifications and also use notifications to respond to messages you write to the characteristic. All the time there is no support for reading the characteristic value because each notification is just a snapshot and there is no logical current value.

    In order to support this service we start with the same initial steps as with the battery example – select a device, connect to the Gatt server on the device and then get the service and then characteristic to use. You do need to pair with the Hub first, however it seems quite happy to be paired with multiple devices so the Lego controller still works after pairing with a PC. The hub shows up as “HUB NO.4” to me, I’ll be honest I don’t know how this name is derived.

    To support change notifications there are two tasks – attach an event handler to the CharacteristicValueChanged event, and call the StartNotificationsAsync() method. This method hides the underlying process of writing to the ClientCharacteristicConfiguration descriptor with either the Notify or Indicate method depending on which is supported.

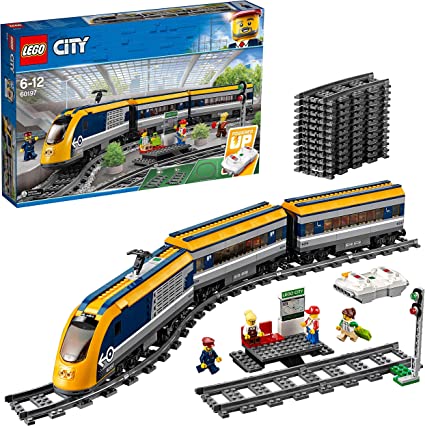
    When you connect to the Lego Hub it will send you a handful of HubAttachedIO messages to tell you what is connected to the ports of the hub and we can query more information about these. The type is quite helpful here as the motor reports as “SystemTrainMotor”. I’m using the Lego Passenger Train 60197 and out of the box it has only 1 port occupied with the drive motor. The second port can be used with the Lego Powered Up Lights 88005 set to add lights to the front of the train. The ports are numbered 0 and 1 in code, you may also receive messages regarding ports over 50 in index and these are reserved for internal use.

    Lego City Passenger Train Set 60197

    Each message contains a standard header of 3/4 bytes and this is then followed by specific data relevant to the type of message. The reason for the variable length of this header is that the first byte can either be used to indicate a message length of up to 127 bytes, or if it has the 8th bit set it indicates a longer length using 2 bytes (from 128 to 215). In this simple example all the packets will be relatively small so we don’t have to worry too much about this.

    The header bytes tell us the length, a hub id (always 0) and a message type. We use a switch statement on the message type to determine how to respond to each type. For each HubAttachedIO message (where the Port ID is less than 50) we send a PortModeInformationRequest message to get the name of the device attached to the port.

    The PortModeInformation message itself has multiple versions depending on the information requested so we parse the incoming name (“LPF2-TRAIN18”) then send another request for the RawRange – this will give us the minimum and maximum values we can set to the device. For the motor drive in the trainset it is -100 to 100 (with 0 being the motor at a dead stop).

    Full Steam Ahead

    In order to visualise this and provide a control mechanism the sample app has a Slider control and so once we have the range we setup the Slider control with the same range (and some labels for clarity) then use the ValueChanged event of the slider to send messages to control the motor. The PortValueSingle message changes a single value and requires the header, the port id (0 is Port A on the hub) and the value stored in 2 bytes.

    private async void Motor_ValueChanged(object sender, ValueChangedEventArgs e)
    {
       if(characteristic != null)
       {
          byte[] messageValue = new byte[6];
          messageValue[0] = 6;
          messageValue[2] = (byte)LegoMessageType.PortValueSingle;
          messageValue[3] = 0;
          BitConverter.GetBytes((ushort)e.NewValue).CopyTo(messageValue, 4);
          await characteristic.WriteValueWithoutResponseAsync(messageValue);
       }
    }

    This gives you the ability to run the train forwards and backwards (and of course stop) just by dragging the slider around. The controller which ships with the train set has three buttons for each channel which increment and decrement the value (speed in the case of the motor) and the middle button returns to zero.

    If you have added the lights, as I have, these show up on PortID 1 (Port B on the hub) and with a valid range of -10 to 10. I was intrigued to see what setting a negative value would do, sadly it didn’t change them to red, nor create a wormhole through space and time, but rather did exactly the same as the equivalent positive value.

    Sample Code

    The full sample project is on GitHub. It includes a number of useful constants and types from the Lego specification. I intend to properly work these up into a library for the Lego service.

  • 12 Days of Bluetooth – #10 Hands-Free

    Bluetooth Classic contains a handful of profiles which use AT commands to work with telephony devices over an RFComm connection. We discussed these briefly in #3 of this series and today will look in more detail and the most commonly implemented one – Hands Free Profile.

    Look No Hands!

    Two similar profiles exist in Headset Profile and Handsfree Profile. Headset was designed for devices with a single action button and mono audio.

    Hands-free Profile is more advanced and is what you’ll find in most car kits and headphone devices. It allows for more complex actions such as dialling numbers and additional audio codecs.

    What all the “AT-command” profile share is a set way of communicating over the serial connection using text commands which have a long history in the world of modems and telephony devices. We will look at some of these commands used to establish a connection later on.

    There are two separate (yet equally important) entities in the hands-free profile, the Audio Gateway (AG) which is the source of the audio (generally a Mobile Phone) and the Hands Free device which has speakers, microphone and controls which we want to operate the AG from.

    You Probably Don’t Want To Do This

    Whenever I’m asked about hands-free service I usually suggest steering clear of implementing this. In most cases your host device already has support for this profile and by establishing a connection you are potentially fighting with the OS itself. The other issue is that the audio part of the equation is handled via a separate Synchronous Connection Oriented (SCO) channel and this is handled lower in the stack than application developers normally have access to. Even in the sample program I created for this article you have to fight with Windows to ensure it is not already connected – the hands-free device won’t respond to multiple connections at the same time.

    In recent versions of Windows this built-in support for Handsfree Profile has had a public WinRT API which we can use. This means you can connect to a mobile phone and make your PC into a hands free device or speaker phone. This is how Thy Phone works with any mobile device whereas Microsoft chose to only allow Android devices with their Phone Link app. There is also support for the Windows PC to be the AG and connect to a Hands Free device such as a headset or one of these cool Fisher Price phones if you are lucky enough to have one!

    Fisher Price Chatter Telephone. Bluetooth toy rotary dial telephone.
    Fisher Price Chatter Telephone

    If the hands free device is connected in Windows settings, you’ll need to disconnect it so that it just shows “Paired” then it is ready to accept a connection.

    Windows Settings showing handsfree devices connected, with menu showing disconnect option
    Windows settings showing device as paired (not currently connected)

    The sample app performs a couple of basic operations and will not establish an audio link.

    Into The Code

    The sample app is a simple .NET MAUI app created from the new project template. The full code is available here on GitHub. I’ve changed the default button to initiate a connection following these steps:-

    • Use the BluetoothDevicePicker to present the available devices to the user to pick one.
    • If selected use BluetoothClient to connect to the Hands-free service.
    • If successful get a Stream to read from the device and respond.

    The rest of the functionality then uses a listening loop which will read blocks of data from the device as ASCII text, and process each line at a time. All messages from the Hands-free device are a single line terminated by a return character. For each command we may need to return a specific response but all have to be followed with an “OK” response (or “ERROR” but we are not doing any error checking here). For responses from the AG to the HF each message is preceded and followed by a pair of carriage return and newline characters e.g. “\r\nOK\r\n” in C#.

    To establish a connection with the HF there are a number of standard and optional queries and responses to deal with. Firstly the HF device will tell the AG device which optional features it supports from a bitmask using the +BRSF code and you must reply similarly, though you can use “BRSF:0” to support none of them.

    The listening loop checks for these core messages and responds with the default responses. To any other command it will return OK. I won’t go into every command but you can look at the source code for more detail. I will highlight a couple of interesting ones:-

    From Core to Apple

    Apple published their own extension to the hands-free profile which is now quite widely supported and it allows the hands free device to report its battery level back to the iPhone (or any device that supports the command). The HF will first send “AT+XAPL” to the AG and if you respond with “+XAPL=iPhone,2” you indicate you support this iPhone specific battery notification. There are a couple of other flags other than 2 you can specify but this is the interesting one.

    After this the HF will send you “AT+IPHONEACCEV” containing key/values depending on which notifications you showed support for. You’ll need to parse this to find the value corresponding to the key 1 and this is a digit between 0 and 9 which give you the battery level of the hands free device to the nearest 10%. There is a helper method in the sample code which shows how to get this. This isn’t as accurate as the Bluetooth LE Battery Level service we looked at before but most handsfree devices use this method. Annoyingly, although Windows has an API for working with hands-free it doesn’t expose the battery level of devices even though you can see through the Windows Settings app that it knows. You can see from the screenshot above that my Chatter Telephone is at 70% battery.

    Call Me

    The last interesting command we listen for is the one to dial a number – “ATD“. The Fisher Price phone is not the most practical in this regard because you have the inherent slowness of dialling each digit and waiting for the dial to return to start with but you have to wait a few seconds following the last digit before it sends the ATD command to the AG. In the sample app we simply parse the number and display an alert dialog to the user. You could technically use this to kick off other actions, but I can’t see it catching on as an alternative to the Stream Deck or similar!

    Final Words

    If you’ve found this interesting, please look at the full sample project on GitHub. In order to start better housekeeping of the 32feet.NET repository I’ll be updating and moving sample apps into their own repository. If you have ideas for new samples or improvements to the existing ones please open an issue so that they can be prioritised, and of course pull-requests are welcomed too.

  • 12 Days of Bluetooth – #9 Pairing

    Both Classic and Low Energy devices can provide functionality to unpaired devices or require pairing first before exchanging sensitive information. However, what exactly is pairing?

    Stick a Pin in it

    The original mechanism for pairing uses a four digit PIN code. One device would need to be discoverable, and the other device upon discovering it would initiate the pairing process. Both sides would have to enter a matching PIN number to successfully pair. The devices then exchange keys which allows their future communication to be encrypted.

    For devices without their own method of input the PIN code would have to be hard-coded – it is not uncommon to find devices with “0000” or “1234” as the PIN. While this might seem very easy to break, they have a mechanism to enable pairing mode for a limited time and so you’d have to have physical access to the device to complete the whole pairing sequence.

    More Security, More Flexibility

    A weakness of the original approach is that it was potentially vulnerable to Man in the Middle attacks (MITM). This is where a device copies and relay the exact response from the two pairing devices so that they thought that they were talking directly but really this third device has access to their encrypted communications.

    Several updates have been made to Pairing through the various Bluetooth specification releases and supporting Low Energy devices. The method that is used for pairing depends on a negotiation between the devices to determine what input and output support they have. Because the capabilities can vary widely, there are a number of available methods.

    Just Works is a basic but relatively insecure approach because it doesn’t require any user input but is quick and easy to perform. It will be used when there is limited input/output support from the peripheral device. You might find this on something like a Bluetooth mouse.

    Passkey entry requires a display on the responding device, the initiator of the pairing will be required to enter the displayed code into their device.

    Out-of-band (OOB) pairing places a required piece of information outside the Bluetooth process. This could be via an NFC tag on the responding device with a unique piece of information. This makes it very difficult for any listening Bluetooth device to get involved in the process because it could not easily have physical access to the NFC tag at the same time. This process can also be known as “tap to pair”.

    Numeric Comparison requires a device with a display to show a random 6 digit number generated using the devices keys and provide at least two buttons for a yes/no response for the user to confirm that the number matches on both pairing devices.

    Authentication, Pairing or Bonding

    Technically Pairing is the process of key exchange between devices, and Bonding is the creation of a long term link after Pairing. Authentication means that the devices have exchanged keys and can conduct encrypted communication – authentication can be short-term, and not a long-term bond. However the words can be used differently in some SDKs. The Android Bluetooth APIs refer to Bonding, Windows APIs use Pairing. Apple don’t really want you to delve too deeply and so don’t expose the pairing mechanism. In the UI these are described as “My Devices”.

    Locking Down Bluetooth LE

    When the Services and Characteristics on a Bluetooth LE are defined they can have a security requirement that the accessing device is Authenticated. This might not be on all functionality – you could have access to the device information such as manufacturer and model, but require pairing for more sensitive device data.

  • 12 Days of Bluetooth – #8 Bluetooth Low Energy in Code

    Following on from the last post, which covered the technology of Bluetooth Low Energy, this post will look at how to use it from code using InTheHand.BluetoothLE. We’re going to look at an example using a simple but widely used service – Battery Service. You can probably guess what it is used for.

    Step One – Get your device

    In the Web Bluetooth world, you must ask the user to select a device using a picker, you can provide a filter to be specific about what type of devices to present to the user. Another restriction with Web Bluetooth is that you can only connect to services which you have specified during this picking process. 32feet.NET’s implementation eases this restriction by allowing you to connect to any service and also by accessing your device either by a programmatic discovery (so you can build your own custom UI), or by using an identifier you have stored from a previous session.

    For the purpose of this example I’ll show you the simplest approach using the picker.

    Debug.WriteLine("Requesting Bluetooth Device...");
    var device = await Bluetooth.RequestDeviceAsync(new RequestDeviceOptions { AcceptAllDevices = true });

    RequestDeviceAsync will return once the user has picked a device, or if they cancel the dialog. Therefore it’s important to check if the return value is null before proceeding. RequestDeviceOptions is a class which provides filters and options to the process, but you can set AcceptAllDevices to true which takes precedence over all other options. The method returns an instance of BluetoothDevice which exposes a unique id (platform specific) and a display name. It also has the ability to connect with the GATT server on the remote device to begin working with services.

    Step 2 – Connect to a Service

    var gatt = device.Gatt;
    Debug.WriteLine("Connecting to GATT Server...");
    await gatt.ConnectAsync();

    Once you have connected you can either request all of the services from the remote device, or select a specific service from its UUID. In this case we use the UUID of the Battery Service.

    Debug.WriteLine("Getting Battery Service");
    var service = await gatt.GetPrimaryServiceAsync(GattServiceUuids.Battery);
    

    Again you need to check if the service returned is null, as the device may not support the requested service. Once we have the service we can then proceed to get the characteristic. You may remember these levels from the “tree” diagram in the previous post.

    Step 3 – Characteristics

    Debug.WriteLine("Getting Battery Level Characteristic...");
    var characteristic = await service.GetCharacteristicAsync(BluetoothUuid.GetCharacteristic("battery_level"));
    

    You’ll see in this snippet I’ve shown an alternative way of specifying the UUID for the characteristic. All of the assigned service, characteristic and descriptor ids have a name too, and the BluetoothUuid class can look these up – so you have a choice of passing one of the predefined constants (like GattCharacteristicUuids.BatteryLevel) or the text version – either “battery_level” or, more formally, “org.bluetooth.characteristic.battery_level”.

    Debug.WriteLine("Reading Battery Level...");
    var value = await characteristic.ReadValueAsync();
    
    Debug.WriteLine($"Battery Level is {value[0]} %");

    Reading the value is quite straightforward. The data is returned as a byte array and the length will depending on the specific characteristic. In the case of battery level it is stored as a percentage value (0-100) in a single byte so we can just read the first element from the array.

    The battery level, unsurprisingly, doesn’t allow the value to be written to, but you can determine the capabilities of any characteristic using it’s Properties property which is a flagged enumeration. Some capabilities of specific characteristics have optional elements so you can’t assume that all devices will behave exactly the same – you need to read the Properties, and you can also read through the relevant Bluetooth specs to find out more. For example the iPhone I’m running this sample against reports Read and Notify flags in the Properties.

    Step 4 – Get Notified

    Notify and Indicate are two special flags which support change notifications, one of the reasons why Bluetooth Low Energy is more efficient than opening a connection and polling for particular values. From a developers perspective they are much the same, the difference under the hood is that Indicate requires a response from the subscribing device (but this is something which is hidden from you in the API).

    To support notifications there is a special Descriptor value on the Characteristic which is called ClientCharacteristicConfiguration. This must be written to with a value to indicate whether to use Notify, Indicate or None for no notifications. You also need to subscribe to the CharacteristicValueChanged event. However in both Web Bluetooth and 32feet.NET this is handled for you using StartNotificationsAsync and StopNotificationsAsync so you don’t need to worry about which underlying method is used.

    characteristic.CharacteristicValueChanged += Characteristic_CharacteristicValueChanged;
    await characteristic.StartNotificationsAsync();
    
    ...
    
    private void Characteristic_CharacteristicValueChanged(object sender, GattCharacteristicValueChangedEventArgs e)
    {
        Debug.WriteLine($"Battery Level has changed to {e.Value[0]} %");
    }

    Of course you can enumerate the Descriptors or retrieve a specific one via UUID if available. There are standard Bluetooth ones defined for ranges, units and formatting of the characteristic value.

  • 12 Days of Bluetooth – #7 Bluetooth Low Energy

    In 2011, Bluetooth 4.0 was introduced and contained the biggest update to the standard yet. It introduced a whole new way of talking to Bluetooth devices which allowed them to use considerably less power. Bluetooth Low Energy works entirely separately from Bluetooth Classic but the two can coexist. For example most mobile phones will support both and expose classic services like Handsfree and low energy services like Device Information or Battery.

    A key element of Bluetooth Low Energy is to move away from the need for a continuous connection and allow devices to make distinct read and write actions and subscribe to change notifications. This has made it possible to implement tiny devices which work for months or years on a small battery. Some examples include location beacons and key fob trackers.

    New Services

    Bluetooth Low Energy introduces a new model and so a large range of defined services for common use cases. As with Bluetooth Classic, those which are approved by the Bluetooth SIG have a short id code and the specifications are available online. You can however define your own custom service (with your own unique id) if you are building a specific device. You may keep this implementation entirely to yourself, or like Apple and Lego, you could publish a specification for others to use. All Low Energy services are based on the Generic Attribute Profile (known as GATT).

    GATT Services can be visualised as a tree – each service can have one or more Characteristic and each Characteristic one or more Descriptors e.g.

    Bluetooth Service (0x180F)
        Battery Level Characteristic (0x2A19)
            Characteristic Presentation Format Descriptor (0x2904) (optional)
            Client Characteristic Configuration (0x2902) (used for notifications)

    A Characteristic is an individual logical property supported by the service. Some services may only contain a single characteristic, other many. Some services may define optional characteristics which are not present on all devices. From a GATT Service you can use an API to either request a specific characteristic by id or request enumeration of all characteristics. Each characteristic may support Read, Write and Notify functionality. The characteristic exposes a Properties value which contains a mask of all the supported operations. It only makes sense for a device to support notifications if the value is likely to change over time – device manufacturer wouldn’t, but the battery level or weight on a scales definitely would. The Write operation may support one or both of WriteWithResponse or WriteWithoutResponse. As the name suggests WriteWithoutResponse is a fire-and-forget operation and you won’t know if or when the operation completed successfully. The Properties value of the Characteristic will tell you which is supported.

    The Descriptor provides additional information about the characteristic. This can often be to describe the units the value is presented in and other display properties so that the requesting device knows how to make sense of the raw bytes. There is a special Client Characteristic Configuration Descriptor which is used to support change notifications – the calling device must write a value to this in order to receive notifications on a specific characteristic. There is no subscribe to all functionality – you request separately for each characteristic.

    Overwhelmed by Advertising

    Bluetooth Low Energy devices broadcast packets, called Advertisements, both as a mechanism to support discovery but also use these to broadcast data themselves. This can be related to a specific service or a manufacturer specific chunk of data. In this way it’s possible to get data from a low energy device without ever establishing a connection. This form the basis of beacons which are constantly broadcasting a unique identifier which can be used to establish a location (especially when multiple beacons are used together).

    Strangely there isn’t an official Bluetooth standard for beacons, but there are multiple implementations in use. Apple devised the iBeacon standard, Eddystone was Google’s implementation – they achieve similar ends but Eddystone supports additional data alongside the unique id. There are some lesser know implementations including URIBeacon which broadcasts a Url rather than an id. It’s possible for a single beacon device to broadcast multiple formats.

    While there is a lot of potential for broadcasting data like this in the advertising packet, it’s important to remember that it is completely public and so not appropriate for all types of devices.

    What a Mesh!

    Following on from Bluetooth Low Energy another standard was created to allow smart devices to communicate between themselves and form a mesh. This is used for smart lighting and other groups of devices and sensors. Devices can send messages out into the mesh which are relayed around to reach further and more reliably than with individual Bluetooth Low Energy communication between two devices.

    Bluetooth LE and .NET

    APIs are available natively on all the platforms .NET runs on, but of course these APIs vary dramatically. 32feet.NET has an implementation for Windows, Android and Apple OSes which follows the Web Bluetooth API model. It currently contains all the client-side functionality described above. Obviously it would be great to eventually extend this to Linux and Tizen as well as add server side functionality to host services and customise advertisements.

  • 12 Days of Bluetooth – #6 Bluetooth Classic on iOS

    Today we take a quick detour to look at something specific to Apple devices.

    You Can’t Handle The API!

    iOS has always been the most “locked-down” mobile platform and one of its restrictions has been a lack of support for developers to work with Bluetooth Classic devices. “But wait, 32feet.NET has support for Bluetooth Classic on iOS!” comes a carefully planted cry from the audience. The truth is there are certain scenarios where you can talk to Bluetooth Classic but terms and conditions apply.

    As with wired accessories, Apple insists that Bluetooth devices require MFi (Made for iOS but originally Made for iPod) certification. This requires a different presentation of the service rather than just reporting Serial Port service or similar. MFi devices require a special chip to support it, making it quite an involved process for a manufacturer to implement. Therefore, on the small number of devices which support this there is often a mechanism to switch modes between iOS and everything else.

    The iOS SDK has a special API specifically for these devices called External Accessory framework and this supports both Bluetooth and wired accessories. As part of the certification each vendor is assigned a specific protocol identifier which is a text string. For example for Zebra thermal printers it is “com.zebra.rawport”.

    32feet.NET is able to implement both the BluetoothDevicePicker and the BluetoothClient using the External Accessory framework on the basis that each device exports only a single service and so maps whatever service UUID (99% of the time for Serial Port Profile) you request to the first available protocol on the device. If anyone knows of a device supporting multiple protocols I’d be very interested to hear about it. From there on in it’s a stream interface so just requires some wrapping to expose a standard .NET stream.

    The key differences between working with iOS and other platforms are:-

    • No device discovery – you have to present the picker to the user or get the previously paired devices.
    • No access to the Bluetooth address of the device.
    • Only a subset of devices are supported and may have to be placed in a specific mode.

    However, if you are aware of these limitations you can still use 32feet.NET to write cross-platform code despite the underlying implementation.

    Low Energy

    Luckily the support for Bluetooth Low Energy is a lot more open (although there are still limitations) and there are no specific device limitations. 32feet.NET’s Bluetooth Low Energy library supports iOS, watchOS, tvOS and macOS – they all share the same CoreBluetooth API (with just a few small differences!). We’ll look at Bluetooth Low Energy later in this series.

  • 12 Days of Bluetooth – #5 Coding Bluetooth Classic

    All the previous posts in this series have talked about Bluetooth technology, in this post we will look at a practical example (using .NET of course!).

    32feet.NET

    From the initial release of the .NET Compact Framework, Microsoft included a library to work with IrDA. This used an API similar to TcpClient and TcpListener but also included functionality to enumerate devices. All of this was built on top of Windows sockets support which was already part of the OS – functionality which was also present in desktop Windows even though it had no .NET API. I set about creating a library which provided the same functionality so that it would work on both full .NET and the Compact Framework. Additionally I was looking at the Bluetooth APIs on both platforms. They had similar capabilities but completely different APIs except for the sockets support which was largely the same. 32feet.NET came about by combining all of this into one library. The name is derived from the fact that 32 feet (or 20 metres) was the maximum range of Bluetooth at the time.

    The library has gone through some updates over time but still based around Client and Listener classes and Sockets doing the actual communication work. In order to support a wider range of platforms the BluetoothClient supports working with a stream which sits above the underlying Socket. There are a number of good reasons for this – on Android the incoming and outgoing streams are separate entities – the library hides this behind a single stream. On iOS there are no Sockets, in fact there is no API for Bluetooth Classic but there is a workaround of sorts (this one deserves its own blog post).

    Discovery

    The first time you want to connect to a device and exchange some data you will first need to discover the available devices. Since the process can take some time to complete it is a good idea to save the address of the chosen device if you are going to use it again. It will be much easier to try to connect, and handle failure, than performing a new discovery each time.

    BluetoothClient currently provides a single method to perform discovery which is run synchronously (for historical reasons but this is something being worked on). The method has an optional parameter to limit the number of results returned but depending on the platform this won’t always shorten the overall time taken. The method returns a read-only collection of BluetoothDeviceInfo objects. This type contains the address, name and class of device information to uniquely identify a remote device. You can enumerate the devices using a foreach loop and read the properties to determine if they match your required device type:-

    foreach (BluetoothDeviceInfo bdi in client.DiscoverDevices())
    {
        // do something with the device...
        System.Diagnostics.Debug.WriteLine(bdi.DeviceName + " " + bdi.DeviceAddress);
    }

    Pick Me, Pick Me!

    If you don’t want to reinvent the wheel yourself you can also take advantage of the native OS device picker. The BluetoothDevicePicker has been rewritten to support async and multi-platforms. Its predecessor the SelectBluetoothDeviceDialog was closely tied to WinForms. This class will present a familiar UI to the user and return either a device if chosen or null if the user cancelled:-

    var picker = new BluetoothDevicePicker();
                
    device = await picker.PickSingleDeviceAsync();

    Make a Connection

    Once you have a device, you need to know the UUID (a Guid in .NET) of the service you want to connect to. The BluetoothService class contains static Guids for all the standard defined services. You pass the address and service UUID to the Connect method. Once this method returns you can check the Connected property to determine if it was successful. From here you can call the GetStream method to return a standard .NET Stream which you can use to read from and write to. If you are writing text then you can wrap this in a StreamWriter (ensuring you use the expected encoding) and write data to the device. Since the stream used implements buffering, be sure to call Flush() to empty the buffer and send all data to the remote device. The following example is used with a generic serial printer which echoes text to the thermal print roll. There are escape codes to print images, barcodes etc but for simplicity we just send simple text.

    When finished make sure you close the stream (by default a StreamWriter will close the associated stream when you close that), this in turn closes the underlying socket.

    client.Connect(device.DeviceAddress, BluetoothService.SerialPort);
    if (client.Connected)
    {
        stream = client.GetStream();
        StreamWriter sw = new StreamWriter(stream, System.Text.Encoding.UTF8);
        sw.WriteLine("Hello world!");
        sw.Flush();
        sw.Close();
    }

    One of the interesting things which you may notice after a while is that disconnections are not reported immediately – a socket may continue to report that it is connected even if the remote device has powered down. The first notice you get that a connection has broken is usually an error when writing data. We will look into this in more detail in a future post.

    Get Involved

    If you would like to get involved there are plenty of opportunities to contribute to the code or documentation as the project expands to new device platforms and functionality. You can also sponsor the project to help move things along.

    Next Time

    In the next post we will look at what on earth is going on with iOS!

  • 12 Days of Bluetooth – #4 Serial Port Profile

    Today we are delving into the details of a basic and widely used service. We may well come back and revisit the lower layers, but this topic will look at something you are likely to use when doing Bluetooth Classic (not Low Energy) development.

    Cutting the Cable

    One of the early aims for Bluetooth was to provide a wireless alternative to the humble Serial Port. Physically a serial port is very basic and allows two-way communication with just a few wires. Over the years faster speeds have been introduced but otherwise it’s the same tech which powers lots of legacy devices such as (if you can remember them) wonderful squawking dial up modems!

    The Bluetooth protocol stack has a number of layers and the one which is commonly accessible to developers is called RFComm (Radio Frequency Communication) and atop this sits a number of standard services which you can implement. The simplest is Serial Port service which has the short id 0x1101. This defines a basic data connection which behaves like a traditional serial port. You can connect to the serial port service on any device (usually you’ll need to have paired with the device first) and exchange data. The Serial Port service doesn’t define what that data should be – you have to know what the remote device is and what to expect.

    Lots of common devices expose just the Serial Port service and will provide their own documentation on protocols etc supported. For example, several Bluetooth printers use Serial Port but you have to know the device specific printing language to correctly print anything. Some may have a binary protocol, others something text based. When we look into some of the telephony profiles, we’ll see that they are often based around the AT commands which were used to talk to phones and modems although these use specific services like Headset and Hands Free and you can use the relevant specifications to understand the commands and responses.

    A device can technically advertise multiple services with the same service UUID, but thankfully this is rare. This can make it tricky when requesting a service by UUID because you’ll generally get the channel number of the first service (which hopefully is the desired one). You’d need to do a more complex SDP lookup to see the differences and decide which to use. SDP records include a name so this can be used to differentiate. Some devices have multiple ways of interacting using different services – many barcode scanners support both Serial Port Profile for low-level control and also HID (Human Interface Device) to appear to the device as a standard keyboard. While the channel id should remain fixed for the lifetime of the device (until powered down/rebooted) we can’t assume it will always be the same and so should request by UUID and not channel number.

    Virtual Insanity

    On desktop PCs there can be quite a lot of old software which is still used long after we expect. It can be too risky to update legacy software to change from a world of COM ports to Bluetooth devices. Therefore, Windows has supported the use of Virtual COM ports. There are only specific scenarios where this makes sense, and you absolutely shouldn’t be considering using them just because you are using Serial Port Profile.

    A virtual serial port is an extra layer of software on top of the normal RFComm connection which exposes itself on your PC as a regular COM port. Therefore, when you have a legacy program which uses a COM port for a GPS, measuring scale or any similar device you can tell the software to use this COM port and it will be oblivious to the actual connection method. You can get Bluetooth to Serial adaptors which allow you to connect a legacy RS-232 device and then advertise Serial Port service. Many of us will have one of these in our box of cables and adaptors which we keep “just in case”.

    In Windows 10/11 the virtual COM ports are a little more hidden as they are part of the old Control Panel and not in the modern Settings app. Go to Bluetooth & Devices, scroll down to More Bluetooth settings and then select the COM ports tab. You can add an outgoing port – assigning a virtual COM port to a specific remote device, or an incoming port – creating a local serial port service which other devices can connect to.

    Next Time

    In the next post we’ll look in a bit more detail at writing code to talk to a device.

  • 12 Days of Bluetooth – #3 Protocols, Profiles and Services

    In this entry we look into the architecture of Bluetooth a little more.

    Stack to Basics

    The Bluetooth protocol stack consists of separate layers from the physical radio up to the high level services which enable various uses from headsets to printers and beyond. The lower levels happen below the Host Controller Interface which is the boundary between device drivers and the OS provided APIs.

    In a very simplified form the stack looks like this:-

    • Services
    • RFComm
    • L2CAP
    • HCI
    • Baseband
    • Radio

    At the bottom the radio level defines the physical radio properties and the actual transmission and receipt of signals. Closely linked to this is the Baseband layer which defines addressing, packet formats and power control.

    HCI (Host Controller Interface) is the layer that provides a standard communication with the host operating system. The OS (whether desktop like Windows or macOS or mobile like Android) provides its own API over this. One of the challenges of 32feet.net is to provide a consistent API across these different operating systems.

    L2CAP (Logical Link Control and Adaptation Protocol) manages multiplexing of multiple services to the underlying HCI, segmentation and reassembly of packets and quality of service(QoS). Not all OSs expose an API for L2CAP services for app developers.

    RFComm (Radio Frequency Communication) provides a simple protocol over L2CAP which emulates the functionality of serial port communication. Operating systems generally expose RFComm functionality via Sockets (similar to IP networking). Essentially once you’ve opened a connection you have the ability to read and write and the socket handles buffering for you.

    Profile or Service?

    You may see features described as either a profile (Serial Port Profile) or a service. Each profile represents a related group of functionalities, and it can consist of one or more service. Commonly this might be because of separate client and server elements to the service. In most cases the profile is assigned the same UUID as the main service it exposes, but in a few cases, there is a separate UUID for the profile from the related services e.g. Basic Imaging Profile (0x111A) which defines separate services including ImagingResponder (0x111B). Therefore, you would never connect to 0x111A itself.

    The services above RFComm start with the most generic – Serial Port Profile which is designed to emulate an RS-232 style serial port connection wirelessly. The other common services fit into a number of broad categories – those based around telephony and audio generally use AT style text commands for control, many of which are based on earlier modem and GSM specifications. For services with audio the RFComm service provides only the control, the audio is carried by a separate SCO (Synchronous Connection-Oriented) link beneath the HCI layer.

    Other services used for exchanging data such as contacts, files and photos use the Object Exchange (Obex) protocol over a serial connection. Obex is a very lightweight protocol originally used over IrDA (Infrared) connections to exchange business cards and more. Switching to Bluetooth meant that you could exchange data faster, over longer distances and without having to have the devices pointing exactly at each other! Fun fact: 32feet.net still supports IrDA and OBEX even on Windows 11 if you have an IrDA adaptor!

    Bluetooth and .NET

    32feet is a .NET library for working with Bluetooth and related personal area networking technologies. When I created it in 2003 it originally contained Bluetooth serial support for Windows CE and desktop Windows along with IrDA and OBEX (Object Exchange). More recently the library has been modernised and Bluetooth LE added, along with support for more platforms. If you would like to get involved there are plenty of opportunities to contribute to the code or documentation as the project expands to new device platforms and functionality. You can also sponsor the project to help move things along.

    Next Time

    In future posts we will expose some of the common services that you might come across.

  • 12 Days of Bluetooth – #2 Discovery

    Continuing the series, today’s post looks at how we discover and identify Bluetooth devices.

    I’m Not a Number

    Every Bluetooth device has a unique numerical address baked into the hardware – like a MAC address for a network adaptor. It is 48 bits long and is often displayed in hexadecimal form, usually with colon separators between each byte e.g. XX:XX:XX:XX:XX:XX. Prior to Bluetooth 4.0 devices would expose a fixed address which meant it was easy to track a device between multiple locations by logging the arrival and departure of a specific address.

    With the introduction of Bluetooth Low Energy there is the possibility to expose random addresses which can either last between device boots or rotate on a timer. The device shares an Identity Resolving Key when paired with other devices which allows the other device to identify the device from its new random address.

    Finally, a non-resolvable address is a random 46 bits and cannot be tracked. This type is quite rare.

    What’s In a Name

    Beyond the address each device also can expose a display name – this is really for the user’s benefit as it can be displayed during discovery and pairing and can either be baked into the device as a model name or customisable like “Keith’s iPhone”. The name can theoretically contain up to 248 bytes but considering you may be listing items on a small screen you have to think about a short and snappy way to identify the device. Sometimes where you might have a large number of the same device (think Barcode scanners in a warehouse) the display name may incorporate the last few digits of the address to help differentiate them.

    Show Some Class

    For Bluetooth Classic there are some additional hints as to the identity of the device. A Class of Device (CoD) contains a bitmask of a major and minor device class e.g. Computer / Desktop. There are classes defined for mainstream devices like phones, headsets etc as well as toys and medical devices. Another bitmask within this CoD defines a ServiceClass which hints and the kind of capabilities of the device while being separate from actual services supported. So if the device specifies Audio it gives us an idea of the kind of device but doesn’t specify which audio services it might support.

    Service Please!

    To actually determine whether we can use a device we have to know if it supports a specific service and for this we have Service Discovery Protocol (SDP). Each service has a unique UUID which is defined by the developer. For services which are adopted and managed by the Bluetooth SIG these have a 16-bit short identifier and a fixed “suffix” which is the same for all these services. For example Service Discovery Server can be referred to with the short id 0x1000 or the full UUID {00001000-0000-1000-8000-00805F9B34FB}. For the purposes of .NET the UUID is 128-bit so maps to the System.Guid type. Any custom UUID you create for a bespoke service must not overlap the official Bluetooth identifiers. If you want to implement one of the standard services you’ll need to follow the specifications so that the behaviour is consistent and other devices can use your service.

    Each active service runs on a specific channel and part of the purpose of SDP is to lookup the channel to make a connection. You shouldn’t hard-code the channel number because this may change. SDP exposes all of the services exposed by a device and parameters for specific services. Most device APIs provide only a mechanism to open a connect to a classic service using the UUID and handle the channel lookup internally.

    Coming Up

    Next time we’ll take a deeper dive into a particular service and how it can be used.