Xamarin Forms doesn’t have a specific PasswordBox control – instead you use the Entry (Think TextBox) and set IsPassword to true. Normally this works as expected and provides a masked entry box. However there is a known issue on Windows Runtime (Phone and Desktop) where AutoSuggest and Auto Capitalisation are not disabled for a Password field. Luckily there is a workaround which is to set the input keyboard to Email. The small side effect is the addition of a “.com” button to the keyboard but it will stop the control capitalising the first letter or showing suggestions based on what you are typing. I added the following code behind:-
This issue doesn’t affect Silverlight apps (TargetPlatform.WinPhone) and I decided not to set the keyboard on other platforms as they work correctly with the default keyboard.
With Windows 10 the original Charms introduced with Windows 8 have gone. Old Windows 8.x apps will display a window menu with those commands if supported in the app e.g.
Window menu on Windows 8.1 Apps
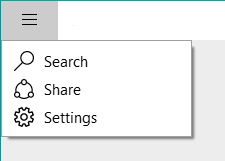
You’ll also notice the icon has changed in Windows 10 to a kind of “three person group hug from above” image whereas they had a kind of clockwise movement to them in Windows 8.1. When you take a look around the first-party apps in Windows 10 many make use of the same Share functionality but it is implemented within the app UI, either in an AppBar or somewhere relevant within the body of the app. For example Edge displays the Share button prominently at the top right of the window. The Store app displays a Share link inside the details for a specific app. Once you tap this the share experience is very similar to Windows 8.x.
Windows Phone never supported charms but did provide the same sharing API from 8.1. My Charming project originally started out by providing these for WP8.0 apps. Apps would have to add a Share button to the AppBar or menu and trigger the full-screen sharing experience. Moving your app to Windows 10 you will want to make use of sharing wherever it is relevant to your app. Taking an approach like Edge would mean adding a TopAppBar. You might use something like the following XAML:-
Until you realise that there isn’t an Icon called Share. It’s not a member of the Symbol enumeration which defines common symbols taken from the Segoe MDL2 Assets font. Luckily the actual glyph is available and we just need to use slightly longer syntax to specify it using a FontIcon:-
That defines a visual element to start sharing, there are two tasks to be completed to allow successful sharing:-
The handler for that button click must call the API which displays the Sharing prompt on screen. On Windows PCs this pops out from the right-hand side and on phones it is a full page view. The code can be as simple as this:-
The other vital part of the process is to setup an event handler for the DataTransferManager which is called when the Share screen appears and asks your app for available data:-
This is only a very basic example. The package title is merely the app name. Imagine you have a news app – you may want to share the article title and a Url to the article on the web. You will probably want to control the availability of the Share button. For example in Edge the button is disabled while a page is loading and enabled once your sat on a finished page.
By adding a Share button to your app you open it up to a variety of targets with very little investment – suddenly you have a mechanism to share your app content across social networks, email and productivity software like OneNote. Unlike Windows 8 you have the power to control the visibility and location of the share command so it fits best with how your app works – but it makes sense to use the same icon as your users will be familiar with this from elsewhere in the system.
With Windows (and Phone) 8.1 there were two different device capabilities which needed to be set to use either RfComm or Bluetooth LE from your app. You had to specify a target device (or All) and target service name(s). With Windows 10 there is a simpler option. You still have to edit the appxmanifest code as it is not visible in the manifest designer but you can set simply:-
This gives you access to all Bluetooth functionality from your app. This is a much simpler approach and less prone to errors. Most of the documentation doesn’t mention this new value except for this page:- What’s different in Windows 10 Insider Preview
“new valid values are “bluetooth”, “wiFiControl”, “radios”, and “optical”.”
These are not mentioned on the “App capability declarations” page so it’s not clear which specific APIs the other intriguing values relate to…
The Windows.ApplicationModel.Appointments namespace in Windows 8.1 (and Windows Phone 8.1) provides access to the user’s calendar. Prior to Windows 10 there were big differences in the APIs as Phone had the existing capability to extend the calendar with app-specific calendars. Now the API is unified across Windows devices but there are some changes to be aware of which will affect existing apps as well as new ones built for Windows 10.
On Windows Phone 8.1 there were two APIs for displaying a new appointment – ShowEditNewAppointmentAsync shows the edit view with the fields pre-populated with the Appointment object you supply. The second API is ShowAddAppointmentAsync which is shared with Windows 8.1. On Phone however it would display the same edit view as ShowEditNewAppointmentAsync. The screen co-ordinates you pass are ignored as the dialog is fullscreen.
On Windows 8.1 only ShowAddAppointmentAsync existed and this displayed a read-only popup view of the passed in Appointment. With just the option to save or discard the appointment (and ability to select which calendar to save in if you have multiple accounts).
If you call either of those two APIs for Windows Phone on a Windows 10 Mobile device you’ll get a different experience. Now you see a read-only fullscreen dialog showing the details of the appointment but you can tap an edit button in the appbar to fully edit the item. You’ve not lost any functionality as such but it is an extra step to get to an edit screen which is especially annoying if that is what you specifically requested.
>
If you call either of those APIs on a Windows 10 PC you’ll get the Calendar app which will show a read-only view of the appointment with the ability to save or discard. There is no edit functionality available at all. If you’re running in Tablet mode Calendar will launch fullscreen, otherwise it just pops up a window over your app. It will be much bigger than the popup used in 8.1.
What’s wrong with this? Given the Calendar application is shared across both device types I’d expect the full version to support editing like the mobile one does. If you click “New Event” in the Calendar app you get an edit screen – this is what I’d expect from ShowEditNewAppointmentAsync. I’d also expect the same edit button on the read-only view. I’d expect ShowEditNewAppointment to open the edit view by default – otherwise there isn’t any point in having two different APIs which do the same thing. I’m hoping that with Mobile still not finished there is time to fix that, or maybe it just needs a tweak to the Calendar app.
In case you missed it there is a great blog post on .NET 4.6 which is a part of Windows 10. Among the various performance and Hi-DPI improvements there are some more subtle enhancements. Perhaps as a nod to Microsoft’s new openness to other platforms there are some helper methods on DateTimeOffset for converting to and from UNIX times. These are represented as the number of seconds since 00:00 on the 1st of January 1970. I’d already come across situations where I needed this and had written a couple of simple conversion methods. They come in useful when doing interop with Android APIs for example. Why not match the .NET 4.6 API I thought so slightly tweaked them and put them in a Gist here:-
This file contains hidden or bidirectional Unicode text that may be interpreted or compiled differently than what appears below. To review, open the file in an editor that reveals hidden Unicode characters. Learn more about bidirectional Unicode characters
/// Converts a Unix time expressed as the number of seconds that have elapsed since 1970-01-01T00:00:00Z to a DateTimeOffset value.
/// </summary>
/// <param name="seconds">A Unix time, expressed as the number of seconds that have elapsed since 1970-01-01T00:00:00Z (January 1, 1970, at 12:00 AM UTC).
/// For Unix times before this date, its value is negative.</param>
/// <returns>A date and time value that represents the same moment in time as the Unix time. </returns>
public static DateTimeOffset FromUnixTimeSeconds(long seconds)
{
return dt.AddSeconds(seconds);
}
/// <summary>
/// Returns the number of seconds that have elapsed since 1970-01-01T00:00:00Z.
Some time ago I created a subset of 32feet.NET to extend the Bluetooth functionality in Windows Phone 8.0. This was for the Silverlight app model and the only API at the time was based around the Proximity APIs. When Windows Phone 8.1 came along it brought a whole new Bluetooth (and Bluetooth LE) API which was, for the most part, consistent with Windows 8.1. I never got around to updating my code for this model.
Looking forwards Windows 10 is just around the corner and the UWP app model includes this same consistent API, with a few additions, across all the flavours of Windows – IoT, Phones and all shapes and sizes of PC. This time I went back to the drawing board and looked at what functionality was missing and could be added in.
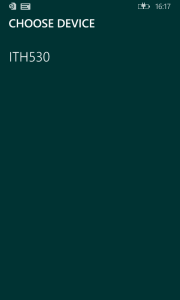
One of the new APIs in Windows 10 is the DevicePicker in Windows.Devices.Enumeration. This is not strictly Bluetooth functionality – any class of device which can be enumerated can be used with it. However it serves as a Bluetooth device picker just fine. Since Windows 10 on phones is a little further away than the imminent launch on the desktop I thought there was a good case for providing this UI now to Windows Phone 8.1 apps and showing how to wrap it to pick Bluetooth devices. Thus you can easily reuse the same code in a Windows 10 project further down the track. Thus the InTheHand.Devices.Enumeration.DevicePicker was born. It uses the same API the exception being that screen rectangles passed in are ignored for Windows Phone as it uses a ContentDialog to pop up the selector. You can still customise the foreground/background and accent colors to match your app. For example the sample code displays this:-
To use the DevicePicker for Bluetooth devices you need to first have the capabilities set correctly in your package manifest (see here for details). Then assuming you have a button or similar to allow the user to start the selection process you can use the following code:-
string aqs = RfcommDeviceService.GetDeviceSelector(RfcommServiceId.ObexObjectPush);

DevicePicker picker = new DevicePicker();
picker.Appearance.BackgroundColor = Color.FromArgb(0xff, 0, 0x33, 0x33);
picker.Appearance.ForegroundColor = Colors.White;
picker.Appearance.AccentColor = Colors.Goldenrod;

// add our query string
picker.Filter.SupportedDeviceSelectors.Add(aqs);

// prompt user to select a single device
DeviceInformation dev = await picker.PickSingleDeviceAsync(new Rect());
if (dev != null)
{
   // if a device is selected create a BluetoothDevice instance to get more information
   BluetoothDevice device = await BluetoothDevice.FromIdAsync(dev.Id);

   // or get the service which you can connect to
   RfcommDeviceService service = await RfcommDeviceService.FromIdAsync(dev.Id);
}
The CodePlex project includes the source code and two samples – one showing the device picker and retrieving device information, the other a Chat application (which is interoperable with the existing 32feet BluetoothChat sample on other platforms. The binaries for the DevicePicker are up on NuGet in this package.
That covers off device selection, the other main area I knew needed some attention is Service Discovery. The Windows API provides the ability to supply custom SDP attributes when creating a service (or as mentioned in a previous blog post an “extension” record containing custom attributes). It also gives the ability to retrieve SDP records. However in both cases it uses IBuffer (the WinRT equivalent of a byte array). Therefore the other part of the new 32feet project is a set of functionality for building (and eventually parsing) SDP attribute values and records. I haven’t published this to NuGet yet as I’m still working on it but the code is there if you fancy a look.
So the next step for 32feet on Windows is a DevicePicker for 8.1 which allows you to painlessly move your code forward to 10, and a portable SDP library which will work with 8.1 and 10 and possibly outside of Windows platforms too in the future…
I’ve just released an update to Charming Storage on NuGet. After a lot of use in Windows Phone 8.1 projects I’ve reworked the TryGetItemAsync StorageFolder extension method to improve the performance. On average it is now takes 1/4 of the time to retrieve file items. Interestingly in Windows 10 this API becomes part of the Universal contract so it will be available on all platforms going forward.
The other change in this release is the addition of a Xamarin iOS library. This includes a LocalSettings implementation for iOS apps. This means that rather than messing about with NSUserDefaults on iOS you can write the same code across Windows and iOS apps. We’ve got a few other “Universal” APIs for iOS and Android on the way…
Recently Xamarin Forms has been expanded to support Windows Phone 8.1 and Windows 8.1. There are instructions online for adding a Windows Phone 8.1 app to your solution and plugging it all together here:-
However there is a small omission which will lead to a build error – #6 tells you to remove the PhonePage base class from your MainPage definition but you actually need to replace it with:-
Added in Windows Phone 8.1 was a new RfcommConnectionTrigger which allows you to host a Bluetooth service on the device and have your background task triggered when an incoming connection is established. This makes a lot of sense as having to have your app in the foreground to receive connections limits the usage somewhat.
In its simplest form you just need to specify an RfcommServiceId for your service, register your background task and the system publishes the required SDP record which allows other devices to discover your service. Your background task is executed when an incoming connection is received and you can cast the TriggerDetails of the received IBackgroundTaskInstance to an RfcommConnectionTriggerDetails. This gives you two useful things – RemoteDevice – a BluetoothDevice which describes the device which initiated the connection and Socket a StreamSocket which allows you to talk to the remote device.
This works well for most devices but what if you have more specific requirements for the published SDP record. In a foreground app you’d use RfcommServiceProvider and this allows you to set individual SDP attributes which are appended to the default record. The RfcommConnectionTrigger mechanism provides something similar but there is literally no documentation on how it is expected to work. The difference from the foreground approach is that rather than setting attributes with id and raw body it has a property called SdpRecord which accepts an iBuffer. It’s very easy to get from a byte array to an iBuffer but we still have to create the SDP record…
At first I thought the best approach was to look at what the default record contained – but unless you assign a record the property returns null (even once the background task is registered and the SDP record is published). The only way to see the exposed record is to read it remotely from another Bluetooth device (one which is a desktop app since device and service discovery is not supported from WinRT). I used Alan’s SdpBrowserDesktop app from 32feet.This showed a fairly standard set of attributes:-
The ServiceRecordHandle is allocated by the host device as is the Rfcomm channel (here 6). If I want to add a service name to this I realised I would have a problem – how can I build a record when I don’t yet know the port that will be assigned (and there is never a way to find this out from WinRT). I built the record anyway hoping that the system would simply read it and replace the value at registration. You get an ArgumentException at the point you call BackgroundTaskBuilder.Register() and it doesn’t contain any useful information. I tried a few variations of this approach and then happened upon another approach – what if I build a valid record but just for the attributes I want to add. Luckily this approach works – your custom attributes are appended to the end of the record and registration succeeds.
I’m documenting this here because there isn’t a way to add to the MSDN documentation and hopefully someone searching will find the answer. I’m working on porting code across so that there is a friendly API available for all current Windows flavours which helps in reading and writing SDP records and attribute values. I can only assume the approaches used by the foreground and background APIs differ because they were written at different times by different teams.
My custom record consists of an ElementSequence, with a 16bit UUID for the attribute (0x0100 – ServiceName) followed by a UTF-8 encoded string e.g.
Element Sequence
   Uuid16: 0x0100
   String (len 11): "Hello World"
Windows 10 supports this same approach and it is no longer for Phones only – it should be universal across phones, desktop and IOT so I anticipate people doing more advanced things with Bluetooth…
Firstly, just to clarify, I don’t rap – this is a post about a useful Remote Desktop server for OSX. Wait, I hear you cry, you’re a Windows developer! Well that is true but I also use Xamarin to produce apps for iOS and Android and to build and deploy iOS apps you have to have a Mac in your workflow. Xamarin have done a great job to minimise this – you can do your development in Visual Studio on your PC but you have to connect to a Mac running their Build Server and you need to use the Mac to deploy apps to the iTunes store.
Because it was only for occasional interaction I don’t want the Mac Mini (which is a very nice looking piece of hardware BTW) setup with a Keyboard/Mouse/Monitor taking up space so it’s running as a headless device. I originally used TeamViewer to occasionally connect to the device but randomly last month the PC client started crashing on load and even an uninstall/reinstall wouldn’t get it working again so I looked for an alternative. I came across iRAPP by CodeRebel. I’d not heard of it before but it seemed perfect – it’s a Remote Desktop provider supporting Microsoft’s RDP protocol which means you can connect using the standard Windows Remote Desktop app. The app is available for Windows, Windows Phone, Android, Mac and iOS and since I use other Windows machines I have it installed on every device I use. By installing iRAPP on my Mac it just works in my Windows environment with no hassles. I found it very reliable over the trial period and have just purchased a license – $79 for a year and even that process is straight-forward and just works. Purchase the license online and click Update License from the iRAPP control panel and boom it’s up and running again!
There is also an iRAPP client for Windows which adds an extra dimension – it allows you to “blend” your desktop – switching to it adds the OSX menubar and dock to your desktop and will open apps in windows transparently on your desktop so you can feel like you are running OSX applications side by side with your Windows applications. Fun stuff but I didn’t really need this.
If you’re interested take a look here – http://www.coderebel.com/products/irapp-client/. There’s no ulterior motive here – I’m not receiving a commission or anything, I was just really impressed by the product and it’s proved reliable and useful.
 >
>