Category: Azure

  • A Journey Through Azure Maps

    This article was originally written in 2018 and there have been a number of additions to the API since then.

    Azure Maps is a suite of services for working with constantly changing location-based information. These cover everything you’ll need whether managing systems with moving elements (Route, Traffic), finding contextual information (Search, Time Zone) or presenting location to users (Render, Map Control).

    Setting up an account is easy, as with all other Azure services you create and manage your Maps account through Azure Portal. This gives you a unique subscription key to pass with each API call. Azure Portal lets you monitor usage and handling billing through your Azure subscription. You can get started in seconds and there is a generous free usage quota per month.

    On the move

    A courier business needs to keep its trucks moving as efficiently as possible to minimize fuel costs and cut down time taken to deliver goods. This requires the ability to both track packages and the vehicles they travel on in real-time and plan complex routes for the drivers to follow.

    On point

    Azure Maps Search service can be used to get physical map coordinates for each delivery address. You can either pass a free form query containing a full or partial address or use the structured API for more direct matches.

    https://atlas.microsoft.com/search/address/json?subscription-key={subscription-key}&api-version=1.0&query=One Microsoft Way&countrySet=US

    This process is known as geocoding and once you have a latitude and longitude you can plot the location on a map or use it to build a route.

    En route

    Once a set of coordinates is available for a particular delivery area they can be passed to the Route service to calculate the best driving route. You can calculate routes with up to 50 waypoints. For up to 20 waypoints you can have the Route service calculate the best order for you. But it doesn’t stop there, there are many more options available to improve the route calculation. If route calculation is done just-in-time you can request that the service use its traffic data to help decide the route to use. Traffic data is updated every few minutes and could save in both wasted fuel and time by avoiding problems.

    https://atlas.microsoft.com/route/directions/json?subscription-key={subscription-key}&api-version=1.0&query=56.551095,14.161954:55.73535,9.131333&traffic=true&instructionsType=text

    In order to support long lists of waypoints you can send the request as a POST and write the lat/long points in the body of the request using a GeoJSON document.

    You can specify vehicle information in great detail, such as weight, height, and width which will exclude unsuitable roads. There is also built in support for hazardous cargos so you can specify standard Hazmat codes to exclude restricted roads. You can also supply fuel consumption information for combustion or electric engines.

    On the way

    Having the best route planned is one thing, to make use of it you need to provide instructions to the driver. You can request either coded instructions which you can render locally or full text instructions in the requested language with optional HTML style tags for context.

    "message": "Keep left at <street>Taulovmotorvejen</street>/<roadNumber>E20</roadNumber> toward <signpostText>Kolding</signpostText>"

    The “instructionsType” parameter to a Route API call specifies the flavor of instructions to return.

    On time

    A customer who has a package in transit will want to be able to track its progress. The package probably has a log with its progress across the globe but to present this to a customer you probably need to convert time stamps into local time for each point. The Time Zone service will allow you to do this. It handles daylight saving changes and the service is backed by the IANA time zone database which is regularly updated. It requires a lat/long coordinate and a UTC timestamp as reference:

    https://atlas.microsoft.com/timezone/byCoordinates/json?subscription-key={subscription-key}&api-version=1.0&options=zoneinfo&query=-13.606902,-172.486005&timeStamp=2015-01-01T12:00:00Z

    Your customer will see that their delivery arrived at their local depot at 4am and they’ll be confident it’ll be delivered that day. The Search service also supports multiple languages which means you can customize the addresses you display to the customer based on their language preferences.

    On screen

    In the back office of your business you need to be able to see that your deliveries are progressing smoothly. You can easily build a map view into your dashboard using the Azure Maps Control. This is a JavaScript control you can easily integrate with an HTML user interface.

    Azure Maps control showing northern Europe, along with search and zoom controls.
    Azure Maps control

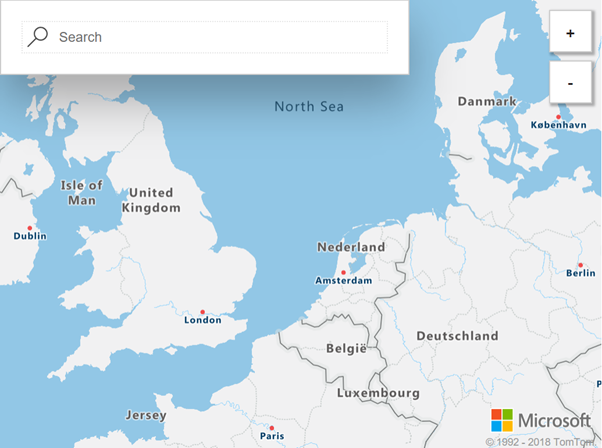
    It has a simple API for adding pins and drawing a variety of geometric shapes. You can even toggle live traffic display with a single line of code. You don’t have to write custom code to load individual map tiles and handle zooming and panning – all this functionality is built right into the control. It uses vector maps for smooth zooming and has a modern uncluttered design. You just need to add a stylesheet and script reference to the Azure Maps control: –

    <link rel="stylesheet" href="https://atlas.microsoft.com/sdk/css/atlas.min.css?api-version=1.0" type="text/css" />
    https://atlas.microsoft.com/sdk/js/atlas.min.js?api-version=1.0

    Then, within the body of your HTML, create an element and give it a unique id (e.g., “map”).

    <div id="map">
        <script>
            var MapsAccountKey = "<_your account key_>";
            var map = new atlas.Map("map", {
                "subscription-key": MapsAccountKey,
                center: [47.59093,-122.33263],
                zoom: 12
            });
        </script>
    </div>
    

    The parameters passed to the Map constructor are the id within the document (in this case “map”), then your subscription key, a point to center the map on, and a zoom level.

    Onwards

    Here we’ve only looked at a few of the uses for Azure Maps, there are many more possibilities. Although we’ve discussed moving vehicles you might instead have a collection of fixed installations. Imagine you were monitoring the properties of distributed sensors and you wanted to visualize the status on a map to see if problems are isolated or following a trend. You could make use of the vast database of addresses to validate data entry.

    The Azure Maps services have been designed to interoperate with a number of open standards such as GeoJSON and can be integrated with other geographic information systems. The RESTful API means they can easily be consumed from a range of languages across a spectrum of devices. You can read about all the Azure Maps services in more detail in the official documentation.

  • Tasks for Alexa Refreshed

    Unfortunately for the past couple of weeks the Alexa skill to synchronise Microsoft To Do with Alexa lists has been limping along due to a mix up with my Azure subscription taking the Azure Function which serves the skill offline. Of course these things always happen when you’re on vacation and don’t have the ability to fix them!

    Once I was able to get the service back up and running there was an ongoing issue with the configuration which meant that new registrations were not completing successfully meaning that changes from the Microsoft side were not being sent to Alexa. Implementing a fix for this was complicated by the fact that I’ve been working on a re-write of the service due to the Microsoft Office API being used reaching end of life and with a shutdown imminent. I’ve therefore had to re-write it against Microsoft Graph which finally supports Todo items but not 100% of the functionality which I could take advantage of in the old Office 365 REST service.

    The long and short of it is that I bit the bullet and completed the Graph API work and the new codebase is now up and running. I’ve also been able to take advantage of updating the Azure Function to .NET 6. The Microsoft Graph API doesn’t support subscribing to notifications for all Todo items so I’ve made the tough choice of removing support for custom lists – the skill will now only synchronise the two standard Alexa lists (To-do and Shopping list). While I know that some users will be disappointed with this, the overhead required to support managing multiple subscriptions and list mappings for custom lists is really beyond the time and energy I have available to work on this and the compromise is a service which satisfies 95% of users and can continue to be maintained as a free skill.

    Because of authentication changes in moving from the Office API to Microsoft Graph it will be necessary to disable and re-enable the skill to pick up the required permissions to read/write Todo items in Microsoft Graph. There are step by step instructions for doing this in the Frequently Asked Questions.

    There is one last gotcha – Microsoft Graph doesn’t currently send change notifications when Todo items are deleted. Therefore to remove a Todo item you should mark it complete before deleting it otherwise it will remain in the Alexa list (or you should delete it from Alexa). This has been confirmed as a known issue and a fix is in the works so the skill will be able to take advantage of this in the next month or two.

  • Alexa List Skills with Azure Functions

    When  I was building my Microsoft To-do Alexa skill I found Matteo’s series of blog posts on Alexa + Azure very useful. However I needed to go beyond the functionality described there and knew I’d need to delve deeper into the Alexa Skills Kit documentation. The first item I thought I’d blog about is the Alexa List Management API. I’m not going to open source the skill but I thought I’d share some pointers which could be useful to other developers.

    What is a List Skill?

    Alexa has built in lists for To-do items and Shopping List. These are quite basic (there are no due dates or reminders for example) but a third-party can extend them to synchronise them with another back-end. When you create a list skill you aren’t providing Alexa with an API into your datastore, but rather are taking responsibility to maintain synchronisation between two copies of the list. Your list items could be updated either from Alexa via the web or app or, more commonly, via a user’s voice command. To support this your skill subscribes to a number of list events which fire whenever an item is added, modified or deleted. Likewise on your backend you’ll need to handle changes and communicate them back to your Alexa skill. I’ll discuss this messaging infrastructure in a future post.

    In its simplest form a List skill doesn’t have to have any speech interface of its own. It just has to handle the standard list events and require read (and likely write) permission on the Alexa household lists.

    Building a List Skill

    If your skill isn’t a regular custom skill you can’t edit the manifest through the Alexa Skill Kit dashboard and so you would use the Alexa Skill Kit command line tools. However rather than suffer the misery of a command prompt you can use trusty Visual Studio Code and the official Alexa Skills Kit Toolkit extension. This allows you to edit your skill metadata in Visual Studio Code’s editor and use the command palette to perform common operations like deploying the skill. The metadata for a skill is expressed in json and the editor has intellisense for the schema. A manifest for a list skill must contain an events object containing a list of standard event types:-

    "events":{
          "endpoint":{
            "uri":"https://YourAzureFunctionAppEndpoint/api/FunctionName",
            "sslCertificateType": "Wildcard"
          },
          "subscriptions":[
           {
             "eventName": "SKILL_ENABLED"
           },
           {
             "eventName": "SKILL_DISABLED"
           },
           {
             "eventName": "SKILL_PERMISSION_ACCEPTED"
           },
           {
            "eventName": "SKILL_PERMISSION_CHANGED"
           },
           {
            "eventName": "SKILL_ACCOUNT_LINKED"
           },
           {
            "eventName": "ITEMS_CREATED"
           },
           {
            "eventName": "ITEMS_UPDATED"
           },
           {
            "eventName": "ITEMS_DELETED"
           },
           {
            "eventName": "LIST_CREATED"
           },
           {
            "eventName": "LIST_UPDATED"
           },
           {
            "eventName": "LIST_DELETED"
           }
          ]
        },
    Also in order to be able to query the list items and write changes you must also request permissions. You’ll need to be careful as the user can revoke these:-
        "permissions": [
          {
            "name": "alexa::household:lists:read"
          },
          {
            "name": "alexa::household:lists:write"
          }
        ]
    The endpoint you defined for events will receive all the event types so you’ll need to write code to read the event type and react accordingly. Now this is where we step into the unknown – the list events require a different request type than is covered with the Alexa.NET library. The good news is there are already a range of companion NuGet packages for specific Alexa APIs and Alexa.Net.ListManagement has what we need here.
    For each of these libraries we have to add a line of code at the beginning of our function to tell the main Alexa.NET library how to deserialise the request. For list management this is:-
    RequestConverter.RequestConverters.Add(new ListSkillEventRequestTypeConverter());
                
    Then from our deserialised SkillRequest we can get the type to determine the type of request which is a specific type depending on the list event e.g. ListSkillItemCreatedRequest. The body of this request will contain a list id which may represent the To-Do list, Shopping List or a custom list. It will also contain one or more list item ids for the newly created item(s).

    Modifying List Items

    The other part of the ListManagement library is the ListManagementClient. This provides access to read and write list items and wraps the REST API. The constructor takes an access token which is passed to your skill in the skill request’s Context.System.ApiAccessToken property. With this (assuming you are granted the required permissions) you can query all list metadata and create, modify and delete list items. However these are operations you’ll mainly do triggered by changes in your linked back-end so you can keep Alexa’s copy of the list in sync with your own data.
    In the next post I’ll look at how to implement messaging so that your own system can send a message to your skill to update items…